THRIFTY THURSDAY: Latest Thrift Finds

I've been thrifting since my days back in high school. Back then, I searched for jackets, coats, and accessories. Although I still rummage the racks, my thrift love has grown to seeking unique pieces and deals on home furnishings. This past Saturday, I ventured up to one of my favorite spots for furniture finds: Faith Farm Thrift in Ft. Lauderdale. About every six weeks, they actually have a SALE, and discount their thrift finds even more. People who know and go to this event usually pull up with a U-Haul to haul away their finds. Here are a few pics of what a spotted Saturday....


Needs a little TLC (missing door on top)
but a great piece for only $39


Great lines on this piece at only $39
Go bold - go red to refinish...
or simplify the update in black or white lacquer


Lovely little side tables for under $10


$35 dresser - but can also be a buffet

$10 dresser

Thrifting is a great means of salvaging discarded furniture, recycle & upcycle, furnish your home or apartment, and even add interest to your already existing interior. Asian inspired details can work great with modern clean line interiors... While French inspired pieces (with all their curves) can add interest and update a more traditional interior. All you need to do is "look past the ugly" - a weekend of stripping, sanding, and painting or a trip to an upholsterer, and you too can update your space - even on a budget...

Most enormous piece yet! YES!! This is ALL one piece. Unfortunately,
it got a little water damaged because the tarp tent gave a way from the rain...

These curvy pieces (at only $35 for the pair) could look great
refinished in bisque, white or pewter...

Ormolu details on this $39 dresser


A pair of bergère chairs only $59
Reupholster in cream linen, a damask, or
for something fun: paint black and go for a bold polka-dot fabric.

A wingback chair for only $25...

If you're in the market to update your space, definitely stop by Faith Farm Thrift, in Ft. Lauderdale. They have two other locations as well - but I haven't ventured to them - YET!!
Boynton Beach Faith Farm
New Furniture and Thrift Store
9538 Hwy 441
Boynton Beach, FL.
(561) 737-2222 (561) 737-2222


Fort Lauderdale Faith Farm
New Furniture and Thrift Store
1980 NW 9th Ave.
Fort Lauderdale, FL.
(954) 763-7787 (954) 763-7787
Donations: (954) 468-1440 (954) 468-1440


Okeechobee Faith Farm
New Furniture and Thrift Store
1852 Hwy 70 West
Okeechobee, FL.
(863) 467-4342 (863) 467-4342


Happy Thrifty Thursday!

DIY WEDNESDAY: Halloween Projects From $0

Quick. Easy. Cheap. Budget friendly Halloween decor you can create yourself from $0 to really no more than $10. Reuse items you already of on hand - scrapbooking scissors, black spray paint, wine bottles out in the recycling bin, or trimmed tree branches. Use any of these five projects in multiples to add impact and drama not only to your decor, but for added ambiance for a Halloween block party...


Black Painted Wine Bottles

Used Arbor Mist MATT glass bottles (but any could work)
Spray painted black SATIN finish
Attached Haunted Wine Labels (packs of mixed labels from Dollar Store)
..........................................................................................
Project total: Under $10 and ya get to drink the wine!
NOTE: Only two shown here, but you can create a MASSIVE centerpiece for party with the same concept, except vary the size of the bottles, and add taper candles to bottle necks. For even more drama - get the tapers that DO DRIP - and let the wax layer & drip onto the painted bottles.

BOO Re-Painted Canvases

Re-Used painted canvases from a prior project
Previously turquoise - now spray painted black semi-gloss
Hung onto 2" nail covering existing NYC letters on wall
Attached w/foam tape 8x10 printed letters
(purposefully not mounted flush to be reminiscent of PB's book pages on crow tree)
................................................................................
Project Total: $0 because reused items on hand
NOTE: BigLots sells canvas boards in various sizes for under $5
The letters below are what I had used (found through Google)


RIGHT CLICK to copy all these letters. Save it. Upload image to Picnik. CROP the letters you need. Use "touch-up - clone" to cover any clips of other letters for the one you need. Edit image with features such as "Vignette" or "Inverted". Save at 300. Print at 8x10.


NOTE: craft this one step further - print letters onto cardstock, cut out to make a stencil,
use white & cream latex or acrylic paint to stipple-stencil lettering onto canvas.

Edit Lettering Using Picnik and Special Paper

Change the look of the printed lettering using Picnik photo editing site features:
Rounded corner frame
Vignette
Vignette and Inverted
Print letter as 8x10 on special or colored paper (like parchment or watercolor) for a more aged look or sticky-back paper to create easy decals
Give your sheets an added detail by using your scrapbook edging scissors
...................................................................................................
Total project cost: $0 because using paper & tools already on hand


Print template
Cut a template from a file folder
Use a silver or white pencils to trace
Fold back craft paper in half
Three (folded) bats fit to a sheet
Cut away!
Attach to walls with pins or double sided tape

...................................................................................................................
Total Project cost: I think maybe $5 for the package of paper (got last year)
(35 sheets - 3 per page yields 102 bats!)


Trim your own tree OR pick up oversized branches the from side of the road
Trim off all leaves
Spray well with bug spray
Allow branches a day to roast in the sun
Bring into house and secure inside an urn (stuff with rocks & newspaper)
Pick-up a bag of Spanish moss at the Dollar Store
Open moss bag and PULL APART in kitchen sink (helps with the mess)
Put your moss parts in a grocery bag and bring to your branch location
Nestle dripping moss naturally into "Y" of branches
Zig-zag moss placement in branches for a well spaced natural effect
Nestle crows into some moss spots
Start with small crows at top of branch, to medium to large at base
...................................................................................................
Total project cost: Only depends on the price of the large & medium crows: I got my large crow last year at Michael's - on sale & with a coupon for only $8. The medium crow was only $3.50 and this years addition of 5 small crows only $1 each at the Dollar Store along with a bag of moss for only $1.
No crows? No problem: Use the bats hot glued to branches!


I have a few more I'll be sharing shortly...
Happy Fall and Happy Halloween!


BOO-BYE!!

(I love this time of year)

LINKING TO:


HITCHCOCK HALLOWEEN HALLWAY

This years "wicked dwelling" decor has been set! Last year, I had set Halloween in our dining room (you can see here) and out front... but this year, I took full advantage of the height and floating shelves in our stairway.  As I mentioned yesterday, Sunday I had watched the Alfred Hitchcock movie Vertigo. This Hitchcock thriller, along with another - The Birds -  ultimately catapulted the Halloween decor vision into the stairway. I already had the decor pulled together in the garage, so I started pulling some of the pieces on the stair landing. Since October first is this coming Friday, it seemed like the right time for Halloween's 'execution' (lol)...


Tree silhouette wall art: $5 thrift find from about 5 years ago...
paired with Hitchcock birds..

Simple DIY projects from thrift finds - I'm sure can also be
improved by several DIY bloggers out there!

Ultimate Green Decor
Utilize found tree branches into height of a space and
put those wine bottles to use: Recycle into haunted decor.

This years addition of Dollar Store spanish moss upt the creepy factor of
last years BigLots skulls, Michael's crows and Target black pumpkin.

Mixing thrift finds (silhouette art), DIY projects, existing home decor & Halloween decorations creates impact on a budget - total cost: only $7 this year for 2 bags of moss and five additional small crows.

Although at first I was inspired by the Pottery Barn Halloween entrance decor, and it even inspired the start of  the previous post Branching Out Into Fall (after finding all those branches on the side of the road - I felt like Morticia Addams while clipping off all the leaves), I really wanted to keep our front entrance more Autumn than Halloween. This space is filled with reused home decor items (like the wood plaques, metal wall plaques, and candle holders)  along with six simple DIY projects - I'll be explaining in more detail in another post this week.

Take an inspiration and make it your own.

Turn Back sign picked up at the grocery store last year for $2.

Existing wall plaques: Wood plaques from Marshalls, metal plaques (on shelves) from Pier One (have three but only used two here).

Make the most of what you have: If you only have a few items, keep them all pulled together for stronger impact vs. trying to spread them everywhere.

Use Google Images to fill thrift frames.
Print on special paper to help age their effect.

Use Picnik to give special effects to images.

Even for Halloween decor: Think of old things in new ways.


Do you decorate for Halloween? What are some things you like to do? Do you have a party? Do you get dressed up in costume? I don't know why I love it so much. Maybe it's so fun because it's an opportunity to REALLY be extra creative - from home decor, to foods, to costumes... When else during the year can you combine all of these? "Maybe" Christmas, but costumes do have their limitations :)


I could have kept going - but know when to say when...


By setting Halloween in the stairway (which also works well with the sound of our bones cracking - lol), it allows the rest of our home to have a warm & cozy Autumn feel. Since branching out for Fall, I've added more burnt orange, colorful Fall leaves, and heavier fabrics like velvet - I'll also be posting these updates shortly, along with some Fall Fix-Up Tips for the house, my latest thrift store finds, wardrobe tips, and updates on the client project...

So stay tuned...


All styling, projects and photos by Lynda Quintero-Davids

LINKING TO:


 MooMoos&Tututs


HAVING FUN WITH A FIRST CLIENT!


Yup... you read right! An old friend from high school (a BFF no less) asked for me to help her in her quest to turn  her previously rented-out townhouse into a new home for her and her two kids. After loosing touch for a few years, we reconnected about a year ago on facebook! We periodically posted on each others walls to keep in touch (usually she posted pics of being out on the boat) so I can't express how happy I was to see an email from her, asking if she could hire me to help her.

Bed & paint color to stay, although I'm thinking of moving the bed to the window wall (the view while in bed looks at the bathroom). I'll be working more with this space after I get the lower level set.


Paint color & sofa to stay - other pieces can go
(maybe to craigslist to add funds to the budget!)


Board on left was option 1 and then better applied to show
space flow to option 2 - board on right.

Besides seeing her in person last Thursday evening, it's been a joy sourcing the Internet and shops for finds and creating a new look for her transitional life. The funny thing is, from the magazines and catalogs I brought to share (to get a sense of her style now) she kept going back to photos I've posted of our townhome. The one she showed the most excitement over was Cash Cab. She said she really likes my style and trusts me in my selections for her... 


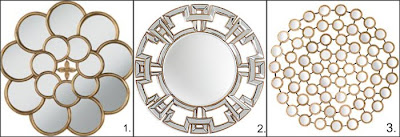
She really loved these mirrors. Mirrors will help reflect
light onto the spaces, as well as add a touch of glam.


Keeping this in mind, along with her response to the numerous questions I've asked her, I've organized folders of categories on my computer, as well as creating sets on Olioboard. Sending all the pics over to Oliboard is helping to conceptualize the space for her, as well as me. She wanted something clutter free, clean and comfortable as somewhat of a retreat from the day. What came to my mind is a hotel style look. I was also able to send over all the sets and she's loving all the selections so far! (woo-hoo!)


The splurge to fit into the budget is to try to fit in changing the  three lower level ceiling fixtures. Two of number 2 or 4, with i or 3 replacing the existing chandelier.


Column floor lamps can help luminate corners
or help designate spaces when used in pairs.

We both spotted lamp 1 while separately visiting Pier 1 over the weekend - so it looks like it's a must. I'm thinking of using two on a table behind sofa - which will also bring sofa away from the wall (and give some hidden storage as well.

She doesn't care for salon styled artwork, so art will be in pairs, triptychs, or quads. To help define the dining space from the living space in her open plan, I'd like to mount one over sized piece, and flank it with either two rectangular column-like floor lamps or two rectangular mirrored sconces I spotted online at ZGallerie. I've lucked out finding a round pedestal dining table at Pier 1 on clearance for only $149... and I may go for Ikea parsons chairs, but add nail head trim (unless I spot a thrift find to refinish!).

Numbers 1 and 3 may be too brown and muddy...

Clean & graphic 1 & 3. Number 2 may be too busy and too light for floor.

After sending her some selections - which she likes for the most part - I'll just need to look for a replacement for the zebra rug (she got me! that piece was more me than her). But that's ok - that's why I always have options when presenting a vision to people (did a LOT of that working at JCPenney's!!)

No on 1. Loving 2, but a bit pricey for budget.

Number three fits well within budget, mimics colors of the zebra rug, but a more clean - graphic look. To also help save some money, I'm thinking I could use one 8x10 rug in Living area, and none in the Dining or Sitting area - because the space is shaped like an "L". But I will keep an eye out for a round rug for sitting area in front of the TV.


This is going to be a fun and new adventure... It further demonstrates two things: When one door closes, another one opens and the advice from a designer friend (Judith Balis of Nest Interiors) who earlier this year said - "just throw yourself out into the universe!" I think by accepting the invitation from Granite Transformations to temporarily work down at the Design District showroom, it opened this universal door. I'd like to expand it by looking into helping people set up their holiday decorations or parties.


Mix of details: whites will pop!


Trays will help keep things organized. Glass will add shimmer.


Smoke & metal details will add elegance.

For the moment, since this is the first time I've done this (for someone other than myself, my mom, or a store), I'm working out some kinks as I go along (for example figuring how to transport larger pieces and when since I have a Jetta - the hubs has a truck). The other challenge is "getting the look for less". But that I am confident I will be able to do between online searches, coupons & discounts, and of course - SHOPPING THRIFT! Which I'm going to take a drive up to Faith Farm Thrift later today to search for some finds... Wish me luck!

Extra seating and storage...
which will also work well with her existing sofa.


Comfy arm chair with ottoman near TV. Two slipper or armless chairs for a conversation nook in sitting area - near TV area in my Option 1 of 3 plan.


Round pedestal table (1) found at Pier 1 on clearance for $149.
It can work in the dining space and work well with parsons chairs (which can easily be upgraded with a nail-head detail).


She would like help setting up the entire townhome, so phase one is getting the lower level and her master bedroom set. I've kept most of the palette neutral to be able to add a simple pop of color (like a shot of teal, turq or green). There are also a pink & blue room for the kids (who spend a lot of time at grandma's house nearby), and she does already have some items for these spaces - I'll help style & finesse. I'd like to spend a day taking photos of the kids - maybe playing on the beach or playground - to use probably in the stairway. She's not looking to do any demo or reno. She'd rather not paint anything - but I am suggesting all trim and doors get a refreshed coat of white, and I'd also like to paint one or two accent walls (the TV wall downstairs and maybe in the master bedroom). She'd rather not do any of the shopping, so I'll be sourcing, planning, shopping, setting and styling everything (woot!) There is an eat-in area in the kitchen to be set where I may use a quad of framed photos I recently shot at a market while visiting up in Georgia. There is also a beautiful bamboo & paver garden patio to set; to keep it simple, I've suggested four club chairs around a fire pit (needs to be simple because the more outside - the more needing to be brought in for a hurricane).

I'll be keeping you "posted" with the project progress...
Thanks for stopping by!


LinkWithin

Related Posts with Thumbnails